DIY Halloween luminaries and lights brew up the biggest impact on your ghostly decor, and they make for easy DIY Halloween crafts from recycled materials, such as paper bags, tin cans, old mason jars, or milk jugs. With Halloween just around the corner, it’s time to start setting the spooky stage!
1. DIY Paper Bag Luminaries
Halloween paper bag lights aren’t anything new, but they are the easiest and most economical way to light things up. You can cut or hole punch your designs out of the bag using stencils, or by simply free handing it. Even easier, use Sharpies to draw faces, words, or other designs.
If you have them, stamps would also work nicely. For larger displays, save up your paper grocery bags. I like the idea of displaying paper luminaries along a walkway leading the way up to your front door. They are also spooktacular on the mantel, kitchen counter, or as a centerpiece for your dining table. Trick or Treat!

2. Tin Can Luminaries
Not only do Halloween tin can lights look pretty awesome, but they will also last for years to come. All you will need are tin cans (coffee cans work great), an awl or large nail, paint, and a hammer. Because the cans will obviously bend out of shape from the hole punching, it’s important to fill them with water and freeze first. This will keep your can intact while punching out your designs.
After frozen, draw your design on your can and use your awl and hammer to punch holes along your design; kind of like connect the dot. Once finished, let the ice melt, dry thoroughly, and paint your can however you’d like! You can also punch a hole on the opposite side of each can and use wire to create hanging lanterns.

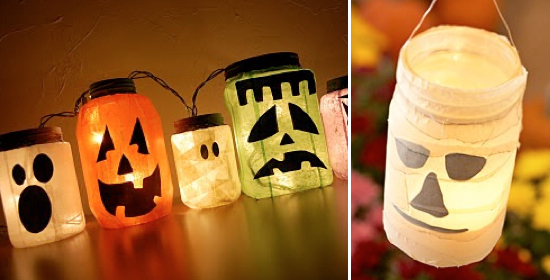
3. Glass Jar Luminaries
I don’t know about you, but I’ve got a kitchen full of glass jars that never get any use. Why not paint and decorate them for Halloween? Whether you use paint or decoupage, there are several ways to create unique Halloween glass jar lights.
You can apply acrylic paint with a sea sponge, wait for your base coat to dry, and then either use paint, Sharpies, or paper to add your embellishments. For instance, you can paint your jar orange and then add your jack-o-lantern face later. You can also use decoupage (equal parts of white glue and water) and tissue paper to cover your jars.
For the mummy luminary shown below, cut out your eyes, nose, and mouth using black construction paper and tape it to your jar, then simply cover the jar in masking tape!

4. Milk Jug Luminaries
Start saving those milk jugs now! They make for the perfect little ensemble of ghosts. All you will need are empty milk jugs, a black Sharpie, scissors or a utility knife, and string lights or battery operated tea lights.
Start off by removing the milk label using Goo Gone or a mixture of oil and baking soda. Use a Sharpie to draw your face, and then cut out a small hole in the back of the milk jug that’s big enough to insert your lights. Happy Halloween!